Construction and equipment of the kitchen in the bus – campers:
Installed a horizontal fur trim just below the windows with more self drilling screws / self-tapping for drywall and construction adhesive. Foam 1 “was installed above and below the seat shelf. To the right, where is the fridge, I painted the inside of the window black, sealed with silicone and insulated until it runs electrically.
Because there will be cabinets along this wall, i only used more self drilling screws / self-tapping, to attach the panels to the ridge of the seat.
I had probably two kitchen cabinet bodies, which were constructed from 3/4 lumber, and not chipboard, so it was easy to trim them. 31 inches tall, 22 1/2 inch deep, just a little deeper than the sink.
Once I have established the locations, built a platform and a face frame for the sink and started with the rack, to go from the dining room. I decided to 3/4 birch layer on top, because well, that's what i had.
Here is the kitchen with the rack frame and cabinet door fitted. In addition to screwing them to the plywood floor and pinning them to the wall, I'll screw their bases 3/4 “to the bus floor. The coverage should be this week and it will be to the right of the sink.
Ready table top with a stove. The table top will be lightly sanded and covered with polyurethane. Wardrobes will be painted – color to be agreed.
Another view of the finished kitchen.
I built a face frame in sections, mainly because, I'm on short pieces of wood from the Craiglist Knotty Pine Kitchen shipment.
The connections are simple, glue, vice, drilling, dredging, screwing in screws for drywall 3 “.
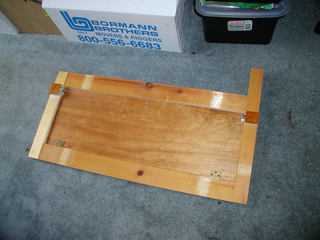
The cabinet door is from the renovation of our friend's kitchen, just like the workbench top.
The connections are simple, glue, vice, drilling, dredging, screwing in screws for drywall 3 “.
An angle fixing the face frame is attached to the ceiling. It is pre-drilled and I will use sheet metal screws 3/4 “at the rear of the front frame, to keep it safe.
The square is chrome-plated and comes from an old exercise machine.
Rowers, treadmills and the like are excellent sources of steel.
Face frame in place. I filled the space between the top and the ceiling with polyurethane construction adhesive, partly after that, to give it endurance, but also for this, to stiffen the roof panels.
This is where the bottom shelf comes in, it is attached to another piece of an angle bar suspended from the same bolts, which keep the cable cover in place.
I cut the cover to the same length as the cabinets, because once the cabinets are positioned, it will not be removable. However, it is short enough, to easily rearrange the wires when needed.
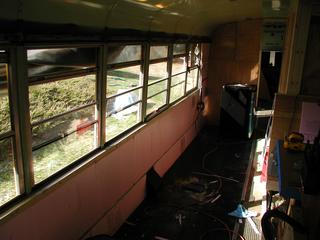 Installed a horizontal fur trim just below the windows with more self drilling screws / self-tapping for drywall and construction adhesive. Foam 1 “was installed above and below the seat shelf. To the right, where is the fridge, I painted the inside of the window black, sealed with silicone and insulated until it runs electrically.
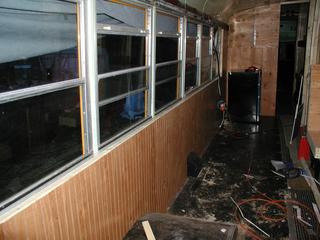 Because there will be cabinets along this wall, i only used more self drilling screws / self-tapping, to attach the panels to the ridge of the seat.
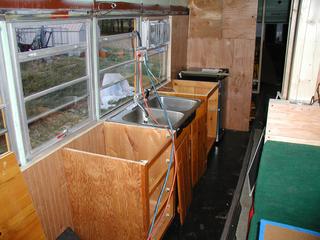 I had probably two kitchen cabinet bodies, which were constructed from 3/4 lumber, and not chipboard, so it was easy to trim them. 31 inches tall, 22 1/2 inch deep, just a little deeper than the sink.
 Once I have established the locations, built a platform and a face frame for the sink and started with the rack, to go from the dining room. I decided to 3/4 birch layer on top, because well, that's what i had.
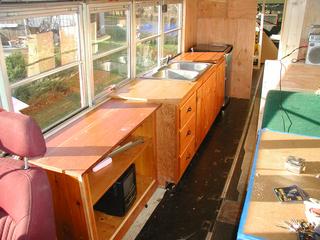 Here is the kitchen with the rack frame and cabinet door fitted. In addition to screwing them to the plywood floor and pinning them to the wall, I'll screw their bases 3/4 “to the bus floor. The coverage should be this week and it will be to the right of the sink.
 Ready table top with a stove. The table top will be lightly sanded and covered with polyurethane. Wardrobes will be painted – color to be agreed.
 Another view of the finished kitchen.
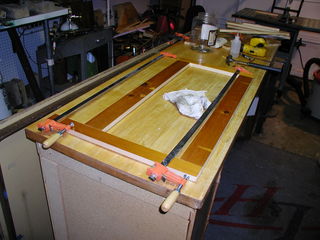 I built a face frame in sections, mainly because, I'm on short pieces of wood from the Craiglist Knotty Pine Kitchen shipment.
 The connections are simple, glue, vice, drilling, dredging, screwing in screws for drywall 3 “.
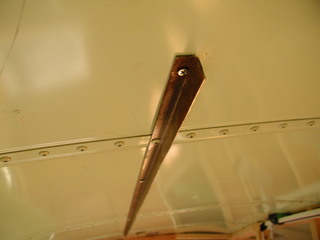 An angle fixing the face frame is attached to the ceiling. It is pre-drilled and I will use sheet metal screws 3/4 “at the rear of the front frame, to keep it safe.
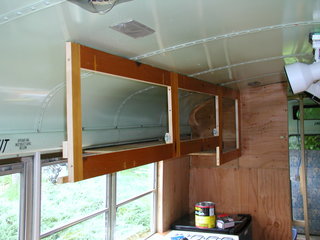 Face frame in place. I filled the space between the top and the ceiling with polyurethane construction adhesive, partly after that, to give it endurance, but also for this, to stiffen the roof panels.
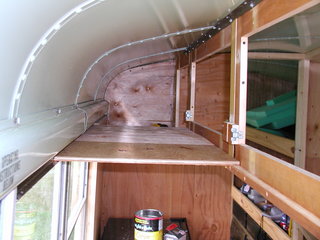 This is where the bottom shelf comes in, it is attached to another piece of an angle bar suspended from the same bolts, which keep the cable cover in place.


- American")


 - Australian")

 - Austrian")
 - Italian")